本文聚焦于AWQ的W4A16 (4-bit weight, 16-bit activation) CUDA kernel的反量化。
背景
在 ZZK大佬的文章 可能是讲的最清楚的WeightonlyGEMM博客 中学到很多知识
最近在学AWQ的量化,AWQ论文
其中我比较关注GPU的部分,其中数据排布这块很有意思:
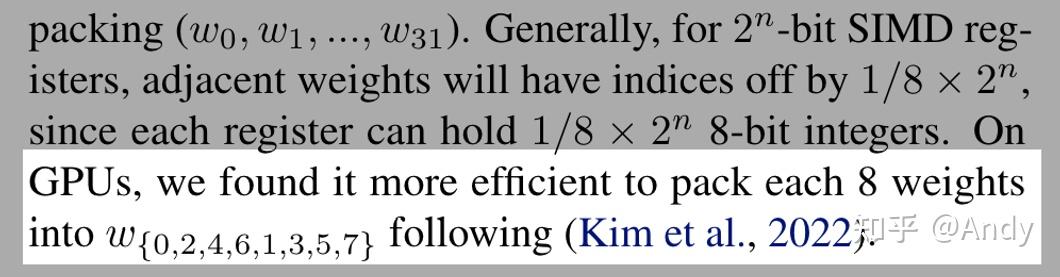
于是到Who Says Elephants Can’t Run 这篇论文看了一下,WeightOnly GEMM 技术就是在这里提出的,其中权重反量化是这么操作的:
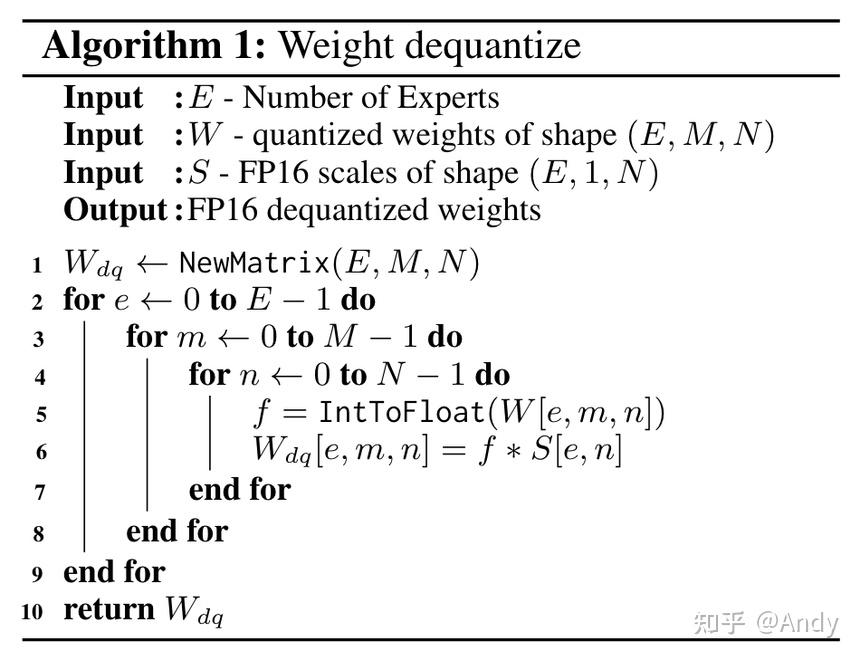
这个论文提出了一种 `IntToFloat 的巧妙的方式,可以大大提速反量化速度。

背景介绍结束,更详细的讲解可以直接看ZZK大佬的文章,接下来解释
dequantize_s4_to_fp16x2 代码。
代码
首先放出完整代码(80行): 1
2
3
4
5
6
7
8
9
10
11
12
13
14
15
16
17
18
19
20
21
22
23
24
25
26
27
28
29
30
31
32
33
34
35
36
37
38
39
40
41
42
43
44
45
46
47
48
49
50
51
52
53
54
55
56
57
58
59
60
61
62
63
64
65
66
67
68
69
70
71
72
73
74
75
76
77
78
79
80
81
82__device__ uint4 dequantize_s4_to_fp16x2(uint32_t const& source) {
assert(false);
uint4 result;
uint32_t* h = reinterpret_cast<uint32_t*>(&result);
uint32_t const i4s = reinterpret_cast<uint32_t const&>(source);
// First, we extract the i4s and construct an intermediate fp16 number.
static constexpr uint32_t immLut = (0xf0 & 0xcc) | 0xaa;
static constexpr uint32_t BOTTOM_MASK = 0x000f000f;
static constexpr uint32_t TOP_MASK = 0x00f000f0;
static constexpr uint32_t I4s_TO_F16s_MAGIC_NUM = 0x64006400;
// Note that the entire sequence only requires 1 shift instruction. This is
// thanks to the register packing format and the fact that we force our
// integers to be unsigned, and account for this in the fp16 subtractions. In
// addition, I exploit the fact that sub and fma have the same throughput in
// order to convert elt_23 and elt_67 to fp16 without having to shift them to
// the bottom bits before hand.
// Shift right by 8 to now consider elt_45 and elt_67. Issue first to hide RAW
// dependency if we issue immediately before required.
const uint32_t top_i4s = i4s >> 8;
// Extract elt_01 - (i4s & 0x000f000f) | 0x64006400
asm volatile("lop3.b32 %0, %1, %2, %3, %4;\\n"
: "=r"(h[0])
: "r"(i4s), "n"(BOTTOM_MASK), "n"(I4s_TO_F16s_MAGIC_NUM),
"n"(immLut));
// Extract elt_23 (i4s & 0x00f000f0) | 0x64006400
asm volatile("lop3.b32 %0, %1, %2, %3, %4;\\n"
: "=r"(h[1])
: "r"(i4s), "n"(TOP_MASK), "n"(I4s_TO_F16s_MAGIC_NUM),
"n"(immLut));
// Extract elt_45 (top_i4s & 0x000f000f) | 0x64006400
asm volatile("lop3.b32 %0, %1, %2, %3, %4;\\n"
: "=r"(h[2])
: "r"(top_i4s), "n"(BOTTOM_MASK), "n"(I4s_TO_F16s_MAGIC_NUM),
"n"(immLut));
// Extract elt_67 (top_i4s & 0x00f000f0) | 0x64006400
asm volatile("lop3.b32 %0, %1, %2, %3, %4;\\n"
: "=r"(h[3])
: "r"(top_i4s), "n"(TOP_MASK), "n"(I4s_TO_F16s_MAGIC_NUM),
"n"(immLut));
// I use inline PTX below because I am not sure if the compiler will emit
// float2half instructions if I use the half2 ctor. In this case, I chose
// performance reliability over code readability.
// This is the half2 {1032, 1032} represented as an integer.
// static constexpr uint32_t FP16_TOP_MAGIC_NUM = 0x64086408;
// Haotian: subtract {1024, 1024} instead, we do not need to map to [-8, 7]
static constexpr uint32_t FP16_TOP_MAGIC_NUM = 0x64006400;
// This is the half2 {1 / 16, 1 / 16} represented as an integer.
static constexpr uint32_t ONE_SIXTEENTH = 0x2c002c00;
// This is the half2 {-72, -72} represented as an integer.
// static constexpr uint32_t NEG_72 = 0xd480d480;
// Haotian: Let's use {-64, -64}.
static constexpr uint32_t NEG_64 = 0xd400d400;
// Finally, we construct the output numbers.
// Convert elt_01
asm volatile("sub.f16x2 %0, %1, %2;\\n"
: "=r"(h[0])
: "r"(h[0]), "r"(FP16_TOP_MAGIC_NUM));
// Convert elt_23
asm volatile("fma.rn.f16x2 %0, %1, %2, %3;\\n"
: "=r"(h[1])
: "r"(h[1]), "r"(ONE_SIXTEENTH), "r"(NEG_64));
// Convert elt_45
asm volatile("sub.f16x2 %0, %1, %2;\\n"
: "=r"(h[2])
: "r"(h[2]), "r"(FP16_TOP_MAGIC_NUM));
// Convert elt_67
asm volatile("fma.rn.f16x2 %0, %1, %2, %3;\\n"
: "=r"(h[3])
: "r"(h[3]), "r"(ONE_SIXTEENTH), "r"(NEG_64));
return result;
}
代码解析
接下来逐句分析: 1
__device__ uint4 dequantize_s4_to_fp16x2(uint32_t const& source)
这行代码定义了一个名为 dequantize_s4_to_fp16x2
的函数,这个函数是一个 CUDA 设备函数
(device),它的输入是一个常量引用 uint32_t
类型的 source,返回值是 uint4 类型。
1 |
|
这段预处理指令检查 CUDA 架构版本是否小于
750。如果是,则触发断言错误,表明该代码不适用于 CUDA 750
以下的架构。否则,继续执行后面的代码。 比如这个函数里面用到了
lop3.b32 函数,可以在 这里
查到
Requires sm_50 or higher.
Qualifier .BoolOp requires sm_70 or higher.
1 | uint4 result; |
这里定义了一个 uint4 类型的变量
result。
接着将 result 的地址转换为 uint32_t*
类型的指针 h,以便后续的位操作。
然后将 source 重新解释为 uint32_t
类型并赋值给 i4s。
通过类型转换和指针操作,使得对这些整数的访问和操作更加便捷。
1 | static constexpr uint32_t immLut = (0xf0 & 0xcc) | 0xaa; |
这里定义了一些用于位操作的常量:
immLut是一个查找表的立即数。BOTTOM_MASK是用于提取较低位的掩码。TOP_MASK是用于提取较高位的掩码。I4s_TO_F16s_MAGIC_NUM是用于整数转换为半精度浮点数的魔数。
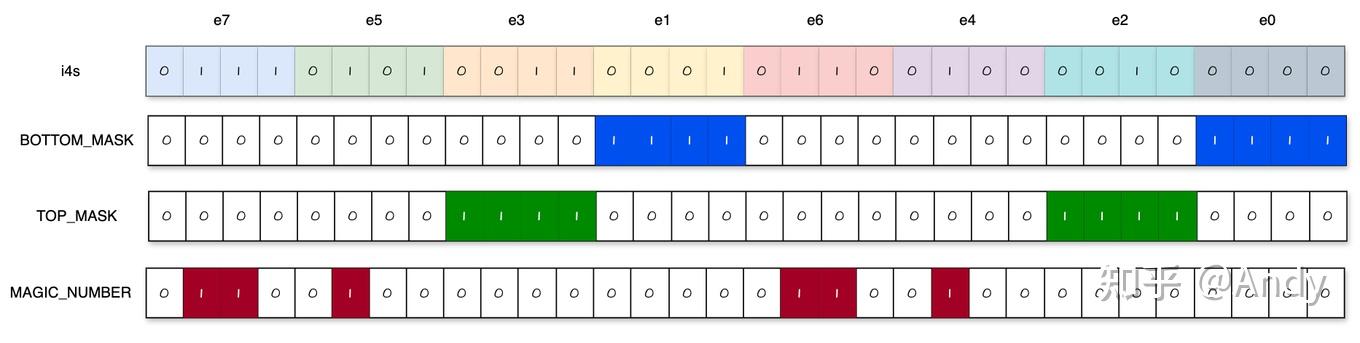
这几个数在内存中是这么表示的,后面用到的时候会仔细说,那时候会发现这几个数可真妙啊。
1 | const uint32_t top_i4s = i4s >> 8; |
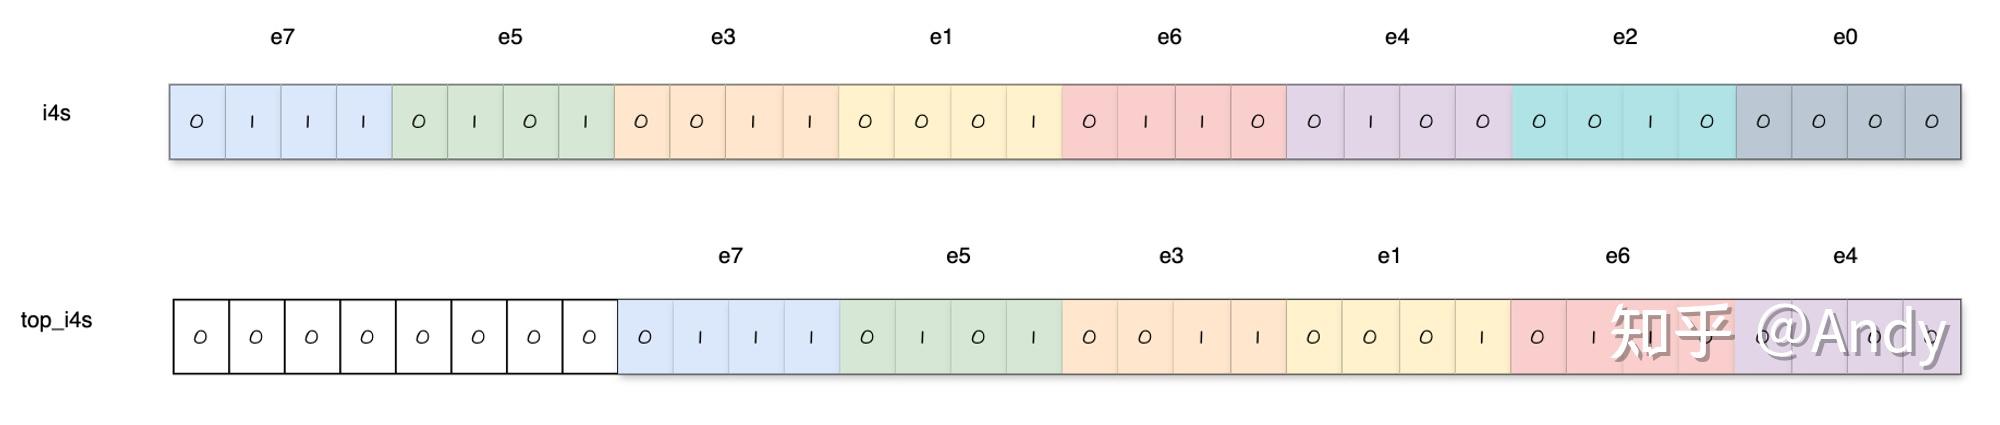
这里是将 i4s 向右移位8位,以便处理 elt_45
和 elt_67。暂时先不要管为什么这么做。
到这里,预备工作都做好了,接下来开始重头戏。
处理e0 e1元素
1 | // Extract elt_01 - (i4s & 0x000f000f) | 0x64006400 |
使用内联 PTX 指令 lop3.b32 执行逻辑操作,将
i4s 的低位(BOTTOM_MASK 掩码)与
I4s_TO_F16s_MAGIC_NUM 结合并存储在 h[0]
中。
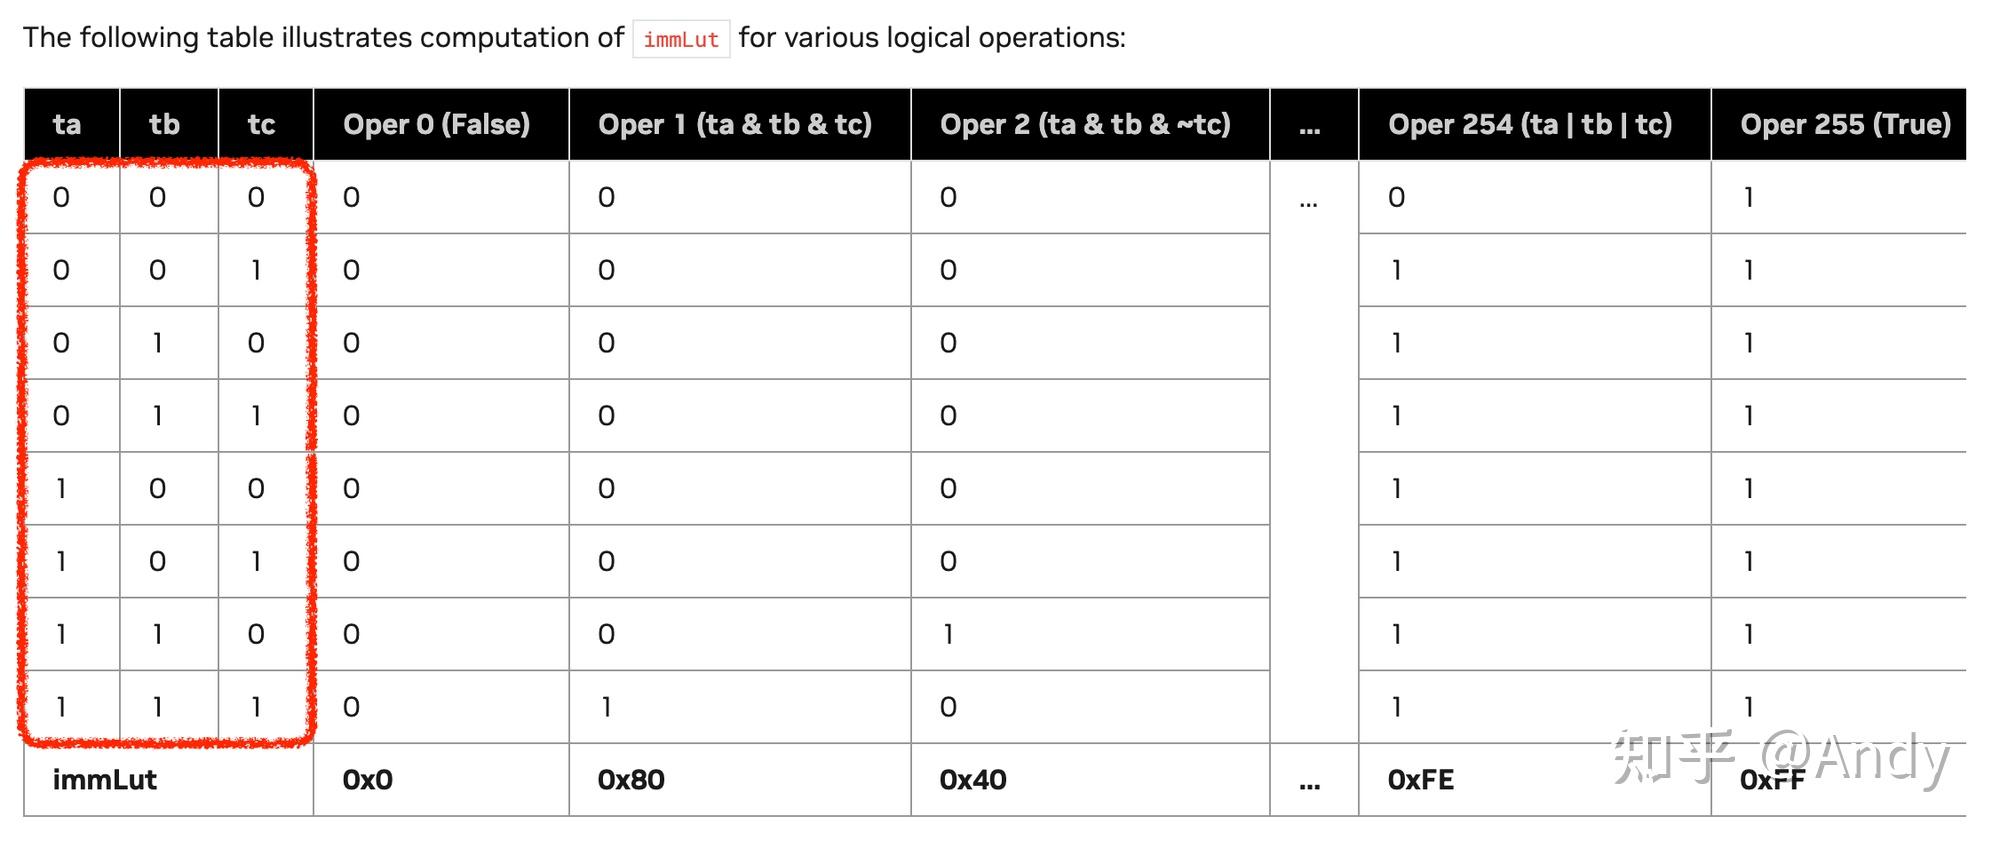
首先看一下 lop3.b32 执行了什么操作,这个
lop3.b32 是一种CUDA汇编指令,用于执行
三元逻辑运算。它利用查找表(immLut)来简化逻辑操作。这个函数可以在这里查到.
For a logical operation F(a, b, c) the value of immLut can be computed by applying the same operation to three predefined constant values as follows:

ta = 0xF0;
tb = 0xCC;
tc = 0xAA;

immLut = F(ta, tb, tc);
比如: 1
2
3
4
5
6
7
8
9
10
11If F = (a & b & c);
immLut = 0xF0 & 0xCC & 0xAA = 0x80
If F = (a | b | c);
immLut = 0xF0 | 0xCC | 0xAA = 0xFE
If F = (a & b & ~c);
immLut = 0xF0 & 0xCC & (~0xAA) = 0x40
If F = ((a & b | c) ^ a);
immLut = (0xF0 & 0xCC | 0xAA) ^ 0xF0 = 0x1A
现在我们可以看一下刚才定义的
immLut = (0xf0 & 0xcc) | 0xaa; 那我们得到的操作就是
(a & b) | c,也就是( i4s & BOTTOM_MASK) | I4s_TO_F16s_MAGIC_NUM.
这里先插一句,这个immLut设置的实在是太妙了!首先,abc这三个数可以形成一个
3 bit 的编码,可以表示 8 种状态,
然后无论abc进行什么样的三元逻辑操作,得到的结果都是唯一的,这也就形成了immLut的表。实在是妙啊。
1 | // Extract elt_01 - (i4s & 0x000f000f) | 0x64006400 |
然后结合具体数值看一下是怎么操作的:
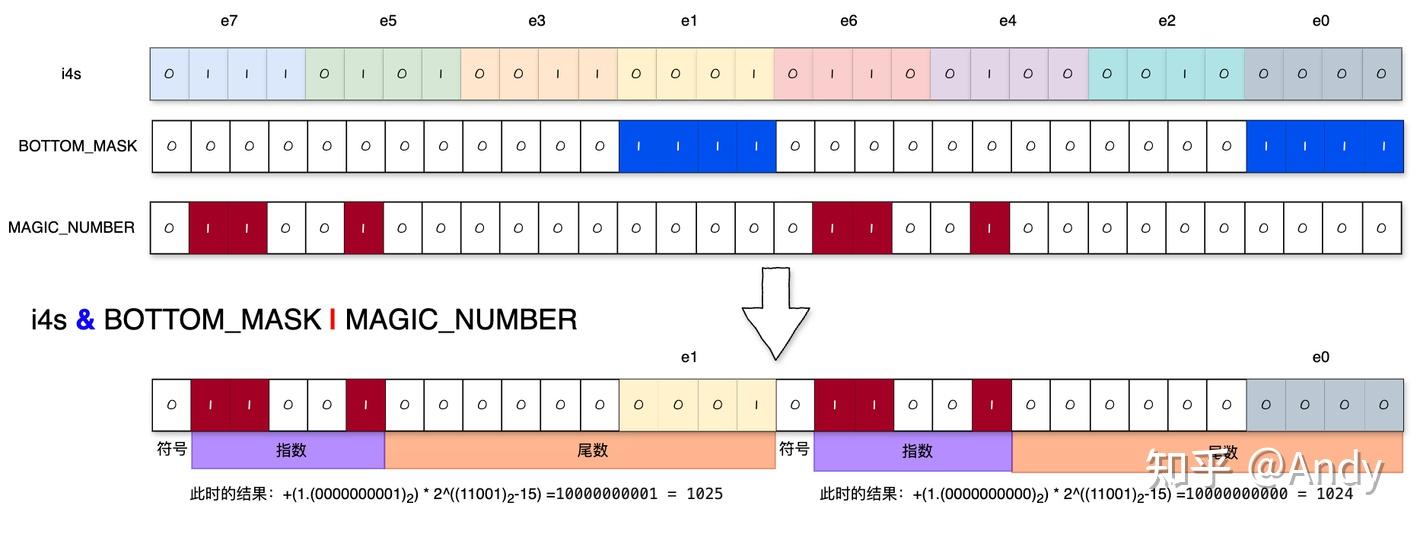
这一步操作是提取元素0和元素1的,这里设置元素0是0000,即
0,元素1是0001,即 1。
i4s与BOTTOM_MASK进行位与操作后,实际上就是把e0和e1筛选了出来,和I4s_TO_F16s_MAGIC_NUM进行位或操作后,是给指数位进行了赋值。
现在看这个 I4s_TO_F16s_MAGIC_NUM
,0x64006400,只看这个指数位部分是
11001,对应数字 25,fp16指数位的偏移量为
2**4−1=15, 那么偏移后指数为 25 - 15 = 10。
以e1为例,
尾数位是0.0000000001,加上1,那就是1.0000000001。
指数位是10,所以结果是1.00000001*2^10 = 10000000001。也就是小数点向后移动10位。
这个结果的十进制是 1025。
这时候就可以理解这个 I4s_TO_F16s_MAGIC_NUM
为什么这么设置了——原来的数值类型是int4,肯定是整数,那么问题的关键就是要把尾数放大到一定程度,使新的数值是整数。那么,显而易见,要把小数点向右移动10位(因为尾数位有10位),也就反推出了magic number的具体数值,妙啊。
显然,此时的结果并不正确,因为加了1并且右移了10位,也就是加了1024,所以我们要把结果减去1024才可以,所以还需要进行这一步操作:
1 | // Convert elt_01 |
其中,FP16_TOP_MAGIC_NUM = 0x64006400;
这句代码实现了减1024这个操作,于是最终得到fp16格式的e1=1,
e0=0,数据无误。
需要注意的是,FP16_TOP_MAGIC_NUM = 0x64006400;这个数代表的其实是fp16格式的
1024。
我最开始在这里感到疑惑,心想为什么要减这么一个数,这也不是1024啊,直到后来意识到现在是在做fp16的减法,那么当然也要是fp16的格式。
ok,到现在为止,最难的部分就理解完了。接下来看一下别的情况:
处理e2 e3元素

对于e2、e3而言,这时候就不能用 BOTTOM_MASK
来进行位与操作了,应该改为 TOP_MASK
1 | // Extract elt_23 (i4s & 0x00f000f0) | 0x64006400 |

如果减去1024,呢么得到e3=48,e2=32,这和刚才不太一样,事情变得不太简单。
问题在哪?以e3为例,这时候小数点右移10位意味着把e3乘了2^4=16,所以当前的结果是1024 + X * 16。
所以针对e2、e3的下一步操作稍有不同:
1 | // Convert elt_23 |
其中,ONE_SIXTEENTH = 0x2c002c00; NEG_64 = 0xd400d400;
这是做了什么操作?可以理解为
(1024 + X * 16) * (1/16) - 64 = X
ok,到现在为止,e0e1e2e3都搞定了,最后看一下e4e5,
处理e4 e5元素

e4 e5元素怎么提取呢?可以先认真思考一下。
我最开始的想法是,针对e4 e5的位置,再写一个mask进行位与操作不就好了,然后和前面做一样的操作。
但是这样是不可行的,以e5为例,这时候e5在16位的高8位,与fp16的指数位有冲突。
那么,处理方式就很简单了,文章最开始的时候提到过这个操作:
1 | const uint32_t top_i4s = i4s >> 8; |

这里是将 i4s 向右移位8位,以便处理 elt_45 和
elt_67。
这样一来,就可以按照e0 e1的方式处理e4 e5了。
ok,到现在为止,e0 e1 e2 e3 e4 e5都搞定了,有了前面的基础,e6 e7理解起来就很简单,这里不做过多赘述。
整个代码实现到这里也就讲完了。
写在最后
最后,补充几点
对于e2e3而言,为什么不像e5e6那样,向右移动8位,然后做e0e1相同的操作?
这样的操作从逻辑上确实更好理解,也避免了后面的乘1/16的操作,看上去似乎更简单。
但是要明白一点,e5e6那样,向右移动8位,是不得不这么做。
为了性能,e2e3没必要额外增加一个移位操作。所以关键点只剩一个:
fma.rn.f16x2指令和sub.f16x2指令的区别,如果 移位+sub指令 快于fma.rn指令,那就是赚的。代码中的注释标明了这一点:In addition, I exploit the fact that sub and fma have the same throughput in order to convert elt_23 and elt_67 to fp16 without having to shift them to the bottom bits before hand.sub(减法)和 fma(乘法累加)具有相同的吞吐量,这意味着它们的性能相当。
为什么要做
interleave?本文缘起就是因为研究这个权重排布

前文中一直没有提这件事——为什么权重是
interleave排布?
按照zzk大佬的观点,对于
Int8来说,本来就是不需要Interleave的,但是Int4快速转换不能使用PRMT指令,需要通过一些trick,进而需要这个交错权重的格式也就是说,
int8快速反量化中,使用了PRMT指令,这个指令的操作粒度是字节byte;而int4是sub-byte,不足一个字节;因此,原来在INT8快速反量化的那一套无法直接用在int4上。所以针对
int4,使用指令LOP3来替代PRMT,从而完成了int4快速反量化到fp16的核心逻辑。通过交错权重,可以减少shift指令,提高性能。关于这一点,我认为[LLM推理优化]🔥WINT8/4-(03): LOP3指令详解及INT4转FP16/BF16分析 讲解的比较详细。